How To Make Your Own Yoto Cards: A Step-by-Step Guide

I’ve officially joined the Yoto Player club, and I couldn’t be more excited! This Christmas, I bought three Yoto Minis so each of my kids could have their own. I’d been hesitant to invest in Yoto players for years due to the upfront cost, but I finally took the plunge to provide a screen-free alternative and help foster their love for audiobooks.
To save money, I decided to make my own Yoto cards, and after creating almost 20, I can confidently say it’s much easier than I anticipated! I’d love to share some tips that helped me!
Let's dive in!
What do you need to make your own Yoto cards?

- Yoto player - I grabbed the mini
- Yoto App on your phone
- Make Your Own (MYO) Cards - Pack of 10 or Pack of 5 *Note: Your new Yoto player includes one "Make Your Own" (MYO) card, so you can try it out with that first and decide if you'd like to purchase more. I bought 30 MYO cards because I knew that’s how I wanted to expand our library.
- Vinyl Sticker Paper
- Canva template — individual book covers
- Canva template — vinyl sticker sheets
- MP3/M4A files of audio books, songs, personal recordings, etc. I purchased majority of our audio books from libro.fm. During their Black Friday sale, I grabbed whatever books were on sale for .99 cents.
- Scissors, computer, and printer. I have an Epson EcoTank 3850 and love it!
STEP 1: How to make your own playlist:

Before you begin, make sure you have all of your MP3 files downloaded and saved to your computer. You will need those ready to go for your Yoto playlist.
If you don't have any MP3/M4A files, I recommend going to Libro.fm and browsing their collection for affordable audio books to get started.
Great Deal: If you use my Libro.fm affiliate link to sign up, you will get 3 FREE audio books with your subscription!
Here's how to make your own playlist on Yoto:
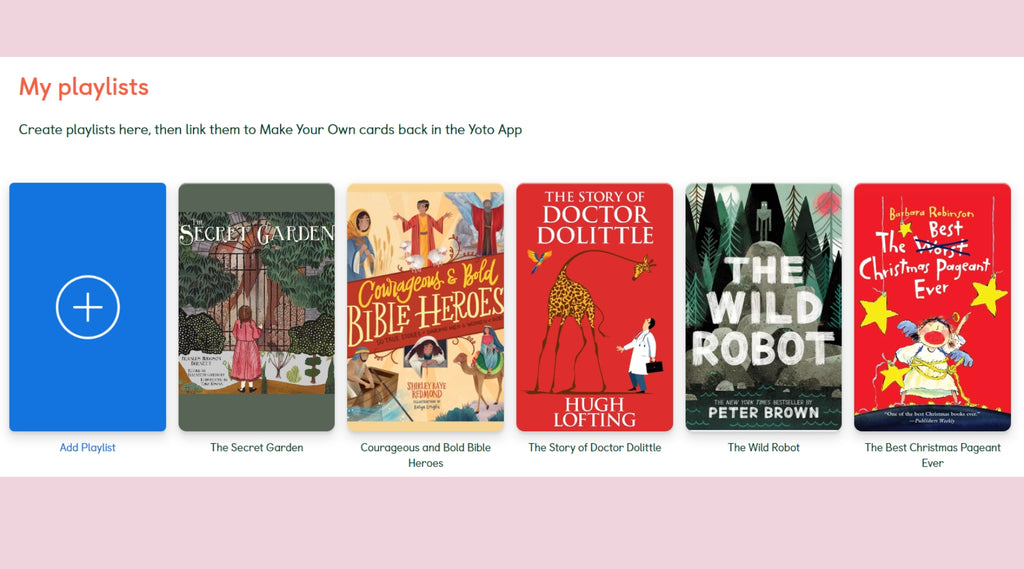
- Create an account on my.yotoplay.com/create . Yoto has instructions, but I've outline them here as well.
- Select
"playlist" then "+ Playlist." I name each playlist with the title of the book I'm uploading. - Click "Add Audio" and select all of the tracks from the audio book you are uploading from your computer.
- Album artwork: I like to customize the playlist artwork to be the book cover. This step is optional, but it makes it very organized. To do this, search the internet for the cover of the book you are uploading. Copy the image to this Canva file. Design the artwork to fit how you would like and download as a JPG. Upload the image to the "artwork" section on your Yoto playlist. You'll also use this JPG for the sticker covers on STEP 3.
- Optional: you can select a graphic for the Yoto player tracks with their custom graphics. For example, I have a bunny showing when they are listening to the Tales of Peter Rabbit. It's optional, but something fun to add.
- Once everything is uploaded, click "create" and you have your playlist finished! It's really simple. Now, repeat for each audio book.
STEP 2: How to get your playlist on your Yoto Card:

The easiest way to do this is with your phone using the Yoto app. You can also use your Yoto player, but I prefer using my phone.
How to link playlist to cards with your phone:
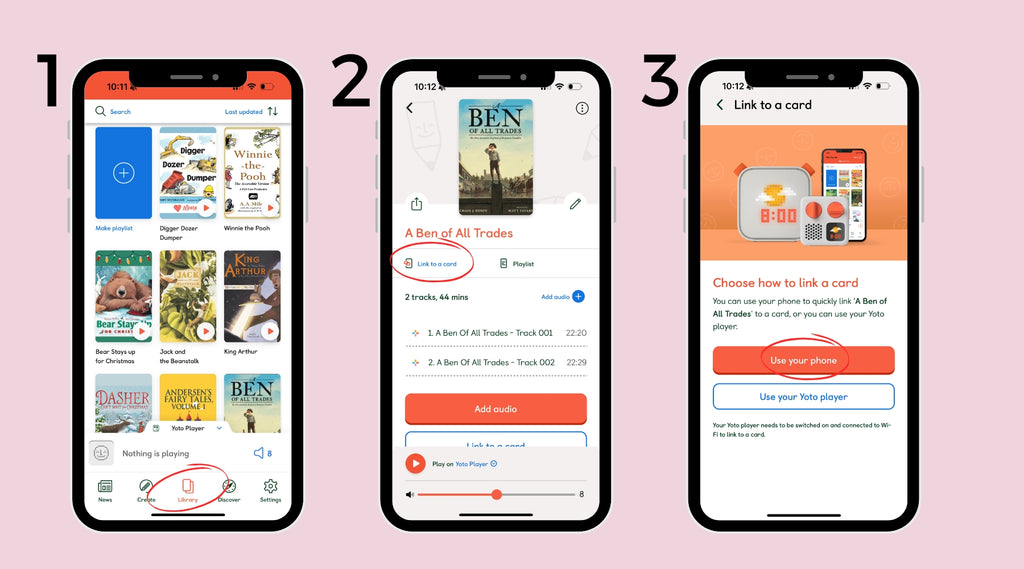
- Download and open the Yoto app on your phone.
- Select "Library" and then click on the playlist you want to load to a card. Having the book covers on your playlist makes it very easy to find.
- When the playlist opens, select "link to a card." Next, simply place the blank Yoto card in front of your phone, and it will magically sync! I was honestly amazed at how quick and easy the process is!
- Repeat with all your blank cards and audio books.
- Tip: It's a good idea to apply the book cover stickers to your blank cards before syncing, to avoid any mix-ups, or you can do both at the same time.
STEP 3: How to add custom sticker labels to your Yoto Cards:

This is an optional step if you want custom sticker covers for each card. If this seems like too much work for you, just skip and write the book titles on the Yoto card stickers. For those wanting custom labels, keep reading.
If you followed my suggestion in STEP 1 and created individual book covers, your artwork should already be ready and saved as JPGs. If not, you can still complete this step, but the covers might not look as clean if they get cropped awkwardly.
- Upload the JPG artwork cover images to Canva with this sticker page template. If you didn't make artwork covers, then search the internet for an image of the cover you want and copy and paste it into the sticker page template. Finding the images on Amazon seems to work best.
- Upload all 9 artwork covers and download as a PDF.
- Test print: I recommend printing the PDF on plain paper first to ensure your computer scaled it correctly. I print mine through Adobe PDF at 100% scale (actual size), and it works perfectly. Just be sure to test it before printing on vinyl sticker paper.
- Once you've tested it, print the PDF onto your vinyl sticker paper. Then, cut out the stickers and apply them to your Yoto cards. That's it! You now have beautifully customized Yoto cards with book covers.
Again, a big thank you to Brighter Day Press for originally sharing this wonderful idea!
More Tips: Voice Memos for Yoto Cards
The sweetest part of these Yoto cards is the ability to upload a recording of anyone reading a book for your kids. I recorded myself reading my toddler’s favorite book using my phone’s voice memos and uploaded it directly to a card. You can also record directly in the Yoto app, but I haven't tried that yet.
Here's how I did it:
- Open your voice memos and record yourself reading the book. I did a separate recording for each section so it was organized as separate tracks.
- Save your voice memos to your phone's file folders.
- Open the Yoto app on your phone and click "Add Playlist."
- Name your playlist and click "Okay."
- Select "Add Audio Files," and your phone’s file folder will open. Choose all the voice memos you saved and import them. That’s it! You now have a custom voice memo playlist on your Yoto card!
A few more tips before you go:
-
Yoto cards are reusable, so you can change the playlist on a card at any time. Simply link a new playlist to the card, and the old one will be erased.
-
You can also upload podcasts to Yoto cards if you have the RSS link. While I haven't done this yet, I know it's possible.
- If the artwork for a cover is primarily white, I recommend giving it a colored border (like I did with Winnie the Pooh) so it is easy to cut out.
As of writing this post, I'm only on day 2 of being a Yoto owner and I'm already excited with all the capabilities. Hope you find this post helpful!
90 Day update: This was the best purchase for my kids! They absolutely love their Yoto players and have flown through all the audio books I made for Christmas. I recently paid for a subscription to Libro.fm so I could get a free credit and purchased the entire Chronicles of Narnia audio collection for only $14.99 (a $55 value)! That's the next set of cards I will be making.
Chronicles of Narnia Tip:
If you purchase the full Chronicles of Narnia collection, you will get all 113 track files, but it won’t tell you which book they belong to. Of course, I have done the work already for my kids, so I am happy to share the track numbers and which book they belong to. I chose to divide the tracks and load them onto separate Yoto cards so the kids can read one book at a time.
Chronological order:
1. Tracks 1-16: The Magician’s Nephew
2. Tracks 17-34: The Lion, the Witch and the Wardrobe
3. Tracks 35-49: The Horse and His Boy
4. Tracks 50-64: Prince Caspian
5. Tracks 65-80: The Voyage of the Dawn Treader
6. Tracks 81-96: The Silver Chair
7. Tracks 97-113: The Last Battle
Publication order:
1. The Lion, the Witch and the Wardrobe (1950)
2. Prince Caspian (1951)
3. The Voyage of the Dawn Treader (1952)
4. The Silver Chair (1953)
5. The Horse and His Boy (1954)
6. The Magician’s Nephew (1955)
7. The Last Battle (1956)
Important Lesson Learned: The very first time you play a card on a Yoto player it is considered streaming content; therefore, you have to be connected to Wifi for the card to work. Once the player has downloaded the card on wifi, it will work without wifi moving forward. I learned this the hard way on a road trip. I made a bunch of new cards but didn't plug them into my kids’ Yoto players while at home on Wifi, so none of them worked in the car. Just an FYI!
You don’t need the entire card to play through, just plug it in and make sure it plays on the Yoto player. That will download the files from the cloud to the player. You need to do this for each individual Yoto player by the way. Another lesson learned.
Here is the Yoto Support page explaining this.
*Please note: Some links are affiliate links which provide a small commission to me at no additional expense to you. I appreciate you shopping through the links to support the efforts behind Driven By Grace — thank you!


